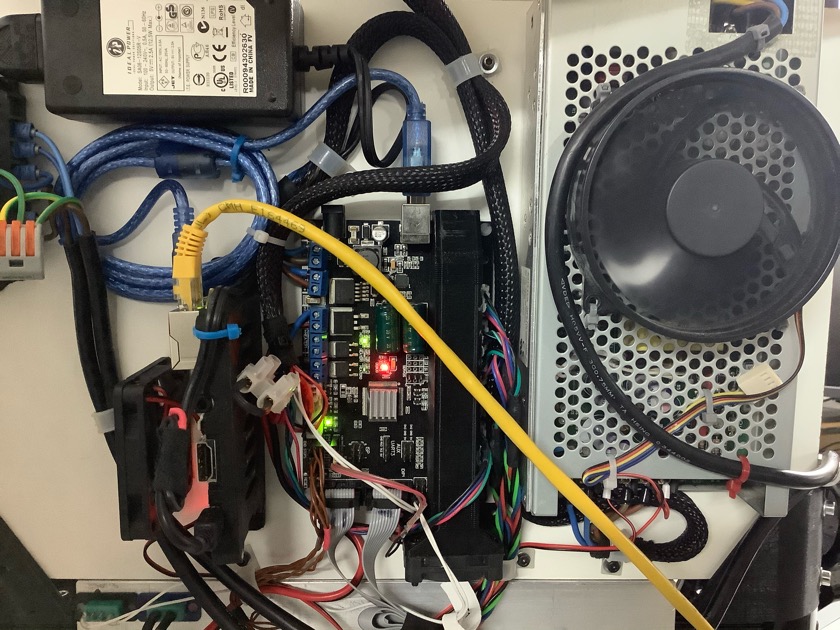
My bed was giving me problems. For ABS you need a bed temperature of at least 100 C. 110 is better. In the original design, all electronics are in the base of the printer, but with a 110 degree bed things were getting too comfy. That resulted in random interruptions of the print, even with added fans in the bottom Since I ran out of PLA and ASA filaments, and only had ABS left, I decided to fix the problem properly. So I stripped everything and rebuild the whole thing. It was only a weeks work, but I am pretty confident things are working better now.
Because I rebuild the bed, it also meant doing all the lovely calibrations from scratch. Anyways, we are back to printing, and at this moment the blinking lights are blinking as they should.
So now I can print a few brackets and bits to finalize the upgrade. Another job done, and hopefully lots of happy ABS parts to come.
Still need to add the camera again, and some interior lights, and a door to keep all the precious heat inside the box, but we’re getting there!
3D print, DLGComments Off on How the Blaster-1 became a E-Blaster
Mar032020
As I mentioned the other day, I decided to turn the Blaster into something Electric. Mostly because I don’t know what else to do with it..
All up weight is now 435 Grams, so that is 81 grams more then without the E. Don’t know how I got the 19 grams earlier. Still happy with it.
The spinner seems to have a slight imbalance, but with a 2S lipo and low rpm it stays together for now. Something to look into later. First we needs some test flights. I also need to think about keeping the prop tight to the fuse. The usual rubber band trick will probably be employed once it flies.
So what’s the plan for launches? Not sure yet, toss it like a normal DLG and hit the motor switch once you release? Need to remember this one has a history, so full power launches will be a bit scary. Anyway, we’ll see.
a bit of this… make a spinner..and you have an E-Blaster
It actually looks quite nice. Sadly the stab and rudder have some damage caused by a once in a lifetime mini tornado that lifted it and tossed into the fence.
3D printComments Off on When you are determined to get things right..
Jan272020
I was still not happy with my ABS printing efforts, and determined the only way forward is to chop up the large pieces. Mind you, that 9 cylinder engine is definitely a printer killer. If you can print that, you can print anything!
So, chop chop. Yep, there is an app for that. Anyways, results are improving. Also found that thinner layers do not necessarily print better. Makes sense I think, 0.1 mm layer cools down fast and prevents the plastic sticking to the previous layer. Best results are with 0.15 at the moment, and variable layer setting (in Cura), to get the top nice and smooth. Most stress appears to be in the bottom sections, even at 95 Celsius build-plate temperature, but hey, it works. Speeds are still up in the 70 mm/sec, (yup, I candothat!), because of the thin layers, prints still take many hours. (note: I don’t have enough power in the build-plate heater to reliably go over 95C. ) I can do 105C if I keep the shed warm, but not when the temp drops to 15C at night. For now, I have to live with 95C. Higher temps would relieve some of the stress, but alas, can’t have everything. As I said before, since using the magic glue potion on the build plate, I have no longer issues with parts popping loose.
make your own engine kit, the version on the right takes 9 hours. left center part takes 3 hours, cyls 1.5 hr each. But overall I have better control and less scrap. minor assembly required. working on the driver 😉
Daniel (#2 son), is doing some free-lance development work for game-figures. Once you have the design it is a small matter to see if your figure can be printed in Real Life. Since the printer is loaded up with ABS plastic, just press ”go”.
I printed this one flat, with 0.2 mm layers, and not enough thickness). I wanted to try out the effects of adding an aceton slurry to the part. I did not do anything to it, just brushed on abs-slurry. (put some scrap abs in a container with aceton, shake and stir. Add more plastic to make the slurry thicker.)
The result: promising. This is more or less the same idea as the vapor treatment, where you hang the part in a closed container with aceton vapor. Using a brush seems to produce similar effects.
Anyway, you can check out the original artwork here, or the rest of wis work at his website.
Where is this going? Maybe you could ask him to make your own custom pilot for instance. Yes I know, you want your own head, but maybe you don’t like your own head, maybe you want something special!
3D printComments Off on Christmas is near, so we slow down a bit.
Dec152019
This time of year other things need my attention, so I’m a bit slow at the moment. I’m still working on the tail side plating near the stabilizer of the SA750.
However, something as mundane as ‘a bit of plain 2mm iron strip’ proves hard to come by at the moment. Everywhere I look I can get stainless steel, but I need the lowest, softest iron I can get. I need it to make those small pesky tags to attaching the plating. This means drilling the holes at the right size for a 2 mm tap, without braking everything. As these things go, the first side went without a hitch, repeating the other side has wipes out my stash of properly sized drills. I am now waiting for Santa to deliver more.
So, in the meantime, I got a request for some multi cylinder gadgets. No problem, he says optimistically, after all the printer prints nice and smooth, at a reasonable high speed, what could go wrong?
Nothing, just that my standard slicer (the one I cursed before) did not want to know. So again back to Cura. At least we are on talking terms, it’s just a matter of dialing in all these variables.
And so you discover that PLA does shrink. Most parts I have printed never had any issues, but this one was challenging. No matter what I tried, it kept warping and popping loose from the bed. At 140 mm diameter, a 1 % shrinkage is 1.4mm. And it does shrink more then that.
Anyway, he who wastes a lot of plastic, will succeed. One of the ”secrets” I discovered was a special magic substance for coating my super duper sticky bed. (as in, I never got to stick large parts to it). There are stories around about using pva based hairspray and such. Then one dark night the lightbulb went on: I’ve got loads of PVA, it’s called wood-glue. Squirted a bit in a container, added a bit of water, mix and apply. (I’ve seen suggestions for a 10-15% ratio water/glue.) And to my astonishment, my very unwilling parts stick. No more warping, no more popping loose.
Printer doing it’s job.
If that was all there is to the story, I would have been finished long ago. But Murphy had a good time!
My extruder stopped at random times, mostly when I was not watching.
The feed tube at the top of the filament heater popped out at midnight.
The filament escaped from the extruder
Of course a blocked nozzle to make it more fun.
My printer can print quite speedily, but that proves its (my) downfall.
Printed parts started cracking after a day.
The extruder problem was caused by a broke wire at the connector motor. Why now? Why not now? It took a bit of searching to locate that problem.
Feed tube is held by an Festo connector. It just got tired from being moved around continuously. Fixed that.
Filament guide had to be remade, including better alignment of feed rollers and tubes.
spaghetti, but not as like it!
Blocking nozzle, obvious some cr@p in there.
Printing too fast: oops, actually, that is fine for small parts, where shrinkage is nu issue. Bigger parts, contrary to gut feeling, need to be printed much slower, so that the hot plastic does not cover more than 2-3cm in length.
So after all this was overcome, I have now printed multiple parts where the print-times are in excess of 18 hours. As always, the end result is much experience gained, a much better printer, and plans for a much larger volume version are being hatched!
The result is a nicely printed 9 cylinder dummy engine, printed at 0.1mm layer (with variable layer thickness at the top) speed of most sections ca 60 mm/sec. Bed is 45 C, nozzle at 215 C. GCODE file is approx 75Meg.
I’m trying to get the steps needed to get this fuselage shape drawn documented. This will be the part that the undercarriage has to connect to.
Insert the imageScale it to the correct dimensionsShift it to the 0,0 origin (just for easiness)Draw a B-Spline curveDo another and shift it backwards 190mmSelect curved shapes, identify the 2 lines, and voila!
The back curve should have a sharper corner, I’ll work on that. Next step is adding the leg and try the fillet parts…
And we have a leg. Next the hardest part yet, a smooth transition between leg and fuselage.
3D printComments Off on It ain’t working the way I want it to..
Oct082019
I’ve come to a grinding halt with OpenSCAD. Pity, but so is life. I learned a lot, and maybe, just maybe there are tricks to do what I want, but since my maths-magic is not that strong, I have decided to stop using it for this project. For quick jobs it certainly does work great. But as soon as you want complicated surfaces, it no longer has the ability (I don’t have the ability) to make it work for me.
But there is an alternative. For too long I have put off using Freecad. Mostly because it takes a lot of learning. So as always, jump in and stick with it. I generally know what I wanted to do. Trace an image (scale it of course) and create a form that can be manipulated. Some tracing something usually involves lots of not so straight lines and curves, the magic words are B-Splines. But between ” it can do that’‘ and something that can be used by me, takes a few hours of hard labor.
Anyway, before I loose it, here is the first ”thing” I made, basically the front part of the fuse, extended backwards. Next I need to copy that to a similar shape, but with slightly different bottom section. It sounds easy. Yes, in a few years I will say that.
The shape I created peeking through the image I used as template.
..and in between I had a pc that blew up, not sure if it is hardware or software, time will tell!
3D printComments Off on This part time retirement is fun!
Oct012019
Another day of shed-time, life is good! Continued cleaning up, while the print-slave does it’s printing. (don’t want to leave him alone, in case the dreaded grey electronic smoke escapes. As is well known: All electronic equipment works by the grace of the grey electronic smoke contained therein. As soon as it escapes, your system stops working!)
Anyway, as I said yesterday, I’m not having much luck with Simplify3D, maybe it always was like this, maybe I just forgot. Whatever, Cura in it’s present incarnation does the job very well indeed. Never a bad thing to have another slicer to fall back on. So today was undercarriage day. Got one legwarmer printed properly, weight is 30 grams. 2 walls, and 8% infill. The 1st one had 4 walls with weight to match (60 odd gram)
The next step is designing the cuffs between legs and fuselage. It looks complicated (it is) but if you start with simple forms, and add on from that, it should all be ok in the end. It’s just a matter of stacking the right size of cylinders, cubes and various other bits of magic together. (Hey, I have to convince me-self that it is simple.)
The end result is sitting in front of the screen, but this black PLA is impossible to photograph, so take my word for it, it’s nice 😉
multitasking!Cura sliced the Openscad design on the right, finished object in the front.
..and no, I have not stopped working on the SA750, this is all part of the fun. I need to make that turtledeck, and the nose-cowl, and various other bits. So, it’s all part of the same game! (oh, and who knows, a driver?
As always I manage to find the bugs.. Just do quick test for the PT-17 legwarmers.
The design was easy, so what can go wrong. I have been using Simplify3D for a long time, always did what I asked it to do. Until now. I asked it to print this very simple structure, but for reasons only known to it’s inner self, it prints the outline and infill and ignores the internal tube. Ok, well if you don’t want to play, there’s always Cura. And lo and behold, Cura plays nice. Ah well, so I let Cura do the slicing and upload the result directly to the Octopi, and all is well. Pity this is, because I really like(d) Simplify for other reasons. I guess I’ll have to dive into the interwebs to find out the why..
Meanwhile, my Printslave is doing it’s bestest.
important bits of code are there, so that I don’t loose them!..always fun to let others see glimpses of the workshop 😉
yeah, I need to add some lights at the back of the camera, now where did I put those leds again?
oh, yes the link to the original code: https://github.com/ErroneousBosch/OpenSCAD_airfoil